Difference between revisions of "Connecting to Jubilee"
Poofjunior (talk | contribs) |
(→on Mac) |
||
| (16 intermediate revisions by one other user not shown) | |||
| Line 1: | Line 1: | ||
| − | The default connection looks like this: | + | ==Intro== |
| + | This page assumes you are connecting to Jubilee (Duet 2) via an Ethernet connection, and it will guide you to setting up a machine with a fixed ip address. The default connection looks like this: | ||
| − | [[File:Jubilee duet2 default connection.png]] | + | [[File:Jubilee duet2 default connection.png|center]] |
| − | Technically, this is a closed network connection between your PC and Jubilee. | + | Technically, this is a closed network connection between your PC and Jubilee. (Note that these instructions are an extension of the [https://duet3d.dozuki.com/Wiki/Setting_up_networking_on_Duet#Section_Wired_direct_connection Duet documentation] of this setup.) |
== Other Connection Options == | == Other Connection Options == | ||
| Line 12: | Line 13: | ||
* '''Standalone with a Monitor, Keyboard, and Mouse''' (''Duet 3 + Raspberry Pi in SBC Mode'' only) | * '''Standalone with a Monitor, Keyboard, and Mouse''' (''Duet 3 + Raspberry Pi in SBC Mode'' only) | ||
| − | These are out of scope of these instructions. More information on these connection options can be found in the [https://duet3d.dozuki.com/ Duet Wiki]. | + | These methods are out of scope of these instructions. If you are specifically looking for a different setup, feel free to pursue something custom. More information on these connection options can be found in the [https://duet3d.dozuki.com/ Duet Wiki]. |
| + | |||
== Hardware Requirements == | == Hardware Requirements == | ||
| − | + | * [https://www.amazon.com/dp/B00M77HMU0 USB-to-Ethernet Dongle]. | |
| + | * Ethernet Cable | ||
== Prerequisites == | == Prerequisites == | ||
| Line 23: | Line 26: | ||
M554 192.168.1.3 ; Gateway | M554 192.168.1.3 ; Gateway | ||
M553 P255.255.255.0 ; Netmask</pre> | M553 P255.255.255.0 ; Netmask</pre> | ||
| − | This is already done | + | This is already done in the [https://github.com/machineagency/jubilee/blob/main/software/duet_config_files/duet2/sys/config.g default duet2 config] file. |
| − | From here, | + | From here, you must now set the IP address of the network connection on the PC side. Follow the next set of instructions specific to your operating system (Windows, Mac, Linux). |
== on Windows: == | == on Windows: == | ||
| Line 31: | Line 34: | ||
If you have a usb-to-ethernet dongle, plug it in now. | If you have a usb-to-ethernet dongle, plug it in now. | ||
| − | Open the Control Panel. Select ''Network and Internet'' and click on ''Change adapter Settings''. | + | Open the Control Panel. Select ''Network and Internet'' >> ''Network and Sharing Center'' and click on ''Change adapter Settings''. |
| + | |||
| + | [[File:Change adapter settings.png|center|700px]] | ||
Right-Click on the network adapter for this dongle and select ''Properties''. | Right-Click on the network adapter for this dongle and select ''Properties''. | ||
| Line 39: | Line 44: | ||
Click the Properties button. | Click the Properties button. | ||
| − | [[File: | + | [[File:Network Properties.png|center|380px]] |
Select Use the following IP address. | Select Use the following IP address. | ||
| Line 48: | Line 53: | ||
You’re setup! Power up the machine, open a browser, and navigate to the machine’s ip address: 192.168.1.2 ([http://192.168.1.2 this page] if you used the same ip address). | You’re setup! Power up the machine, open a browser, and navigate to the machine’s ip address: 192.168.1.2 ([http://192.168.1.2 this page] if you used the same ip address). | ||
| + | |||
== on Mac == | == on Mac == | ||
| Line 54: | Line 60: | ||
Open the System Preferences. Select ''Network'' and click on ''USB/10/1000/LAN''. | Open the System Preferences. Select ''Network'' and click on ''USB/10/1000/LAN''. | ||
| + | |||
| + | [[File:MacUSBDongle.png|frameless|center]] | ||
Use the following settings: | Use the following settings: | ||
| Line 73: | Line 81: | ||
If you have a usb-to-ethernet dongle, plug it in now. Open your network settings and click on the gear near the wired connection that corresponds to the dongle. | If you have a usb-to-ethernet dongle, plug it in now. Open your network settings and click on the gear near the wired connection that corresponds to the dongle. | ||
| − | [[File: | + | [[File:Ubuntu network setup.png|center|640px]] |
Give the connection a name. We called it ''static_duet_connection''. | Give the connection a name. We called it ''static_duet_connection''. | ||
| − | [[File: | + | [[File:Name network.png|center|450px]] |
Next, set a static ip address with the following settings: Note that this IP address can be whatever you like, but it will need to match the gateway of the machine’s config.g settings. | Next, set a static ip address with the following settings: Note that this IP address can be whatever you like, but it will need to match the gateway of the machine’s config.g settings. | ||
| − | [[File: | + | [[File:Addresses.png|center|450px]] |
You’re setup! Power up the machine, open a browser, and navigate to the machine’s ip address ([http://192.168.1.2 this page] if you used the same ip address). | You’re setup! Power up the machine, open a browser, and navigate to the machine’s ip address ([http://192.168.1.2 this page] if you used the same ip address). | ||
Note that these IP address settings will now be tied to this particular dongle until you change or remove them. | Note that these IP address settings will now be tied to this particular dongle until you change or remove them. | ||
Latest revision as of 12:24, 16 July 2021
Intro
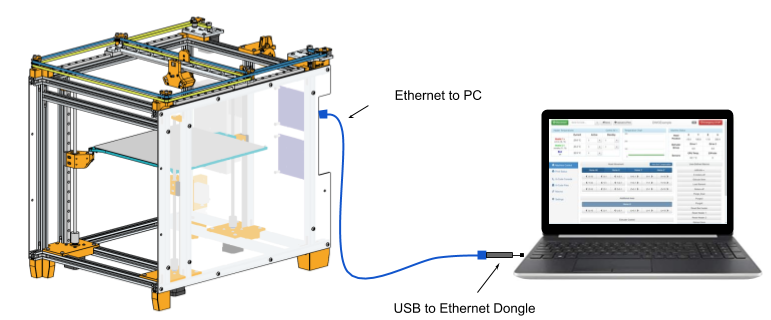
This page assumes you are connecting to Jubilee (Duet 2) via an Ethernet connection, and it will guide you to setting up a machine with a fixed ip address. The default connection looks like this:
Technically, this is a closed network connection between your PC and Jubilee. (Note that these instructions are an extension of the Duet documentation of this setup.)
Other Connection Options
There are many ways to connect to Jubilee. They include:
- Standalone with a Panel Due
- Through your Home Network on a Wired Connection
- Through your Home Network on a Wireless Connection (Duet2 Wifi or Duet 3 + Raspberry Pi in SBC Mode only)
- Standalone with a Monitor, Keyboard, and Mouse (Duet 3 + Raspberry Pi in SBC Mode only)
These methods are out of scope of these instructions. If you are specifically looking for a different setup, feel free to pursue something custom. More information on these connection options can be found in the Duet Wiki.
Hardware Requirements
- USB-to-Ethernet Dongle.
- Ethernet Cable
Prerequisites
In Jubilee’s config.g file, you must first set a fixed IP address.
M552 P192.168.1.2 S1                    ; Use Ethernet with a static IP
M554 192.168.1.3                        ; Gateway
M553 P255.255.255.0                     ; Netmask
This is already done in the default duet2 config file.
From here, you must now set the IP address of the network connection on the PC side. Follow the next set of instructions specific to your operating system (Windows, Mac, Linux).
on Windows:
If you have a usb-to-ethernet dongle, plug it in now.
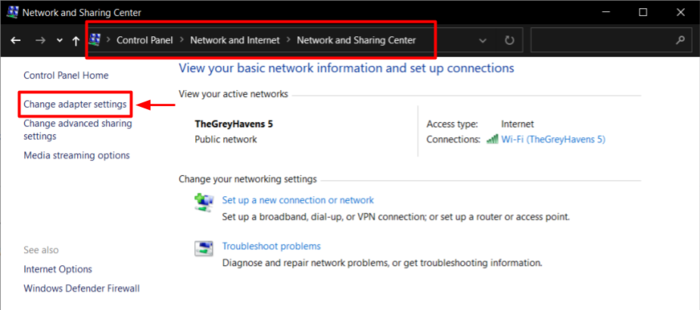
Open the Control Panel. Select Network and Internet >> Network and Sharing Center and click on Change adapter Settings.
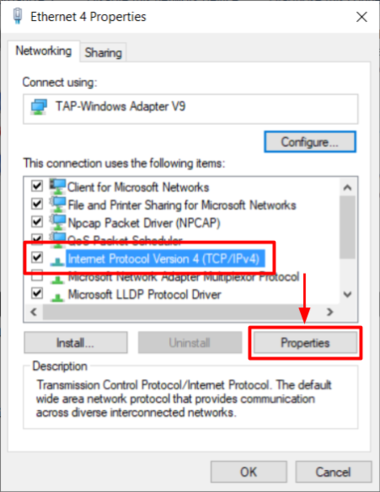
Right-Click on the network adapter for this dongle and select Properties.
Select Internet Protocol Version 4 (TCP/IPv4).
Click the Properties button.
Select Use the following IP address.
Set the IP Address to 192.168.1.3. (You can also change it to whatever you like, provided that this setting matches the Gateway setting of the config file.) Set the netmask to 255.255.255.0. Leave the gateway blank.
Exit this window and the control panel.
You’re setup! Power up the machine, open a browser, and navigate to the machine’s ip address: 192.168.1.2 (this page if you used the same ip address).
on Mac
If you have a usb-to-ethernet dongle, plug it in now.
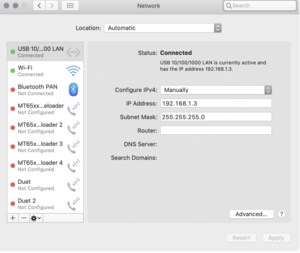
Open the System Preferences. Select Network and click on USB/10/1000/LAN.
Use the following settings:
Configure IPv4: Manually
IP address: 192.168.1.3
Subnet Mask: 255.255.255.0
Router: leave blank
Exit this window and the system preferences.
You’re setup! Power up the machine, open a browser, and navigate to the machine’s ip address 192.168.1.2 (this page if you used the same ip address).
on Ubuntu:
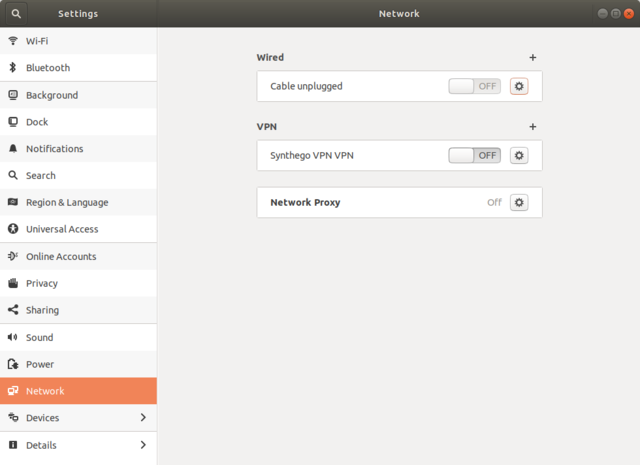
If you have a usb-to-ethernet dongle, plug it in now. Open your network settings and click on the gear near the wired connection that corresponds to the dongle.
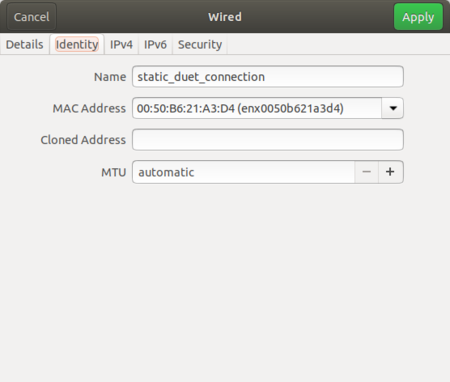
Give the connection a name. We called it static_duet_connection.
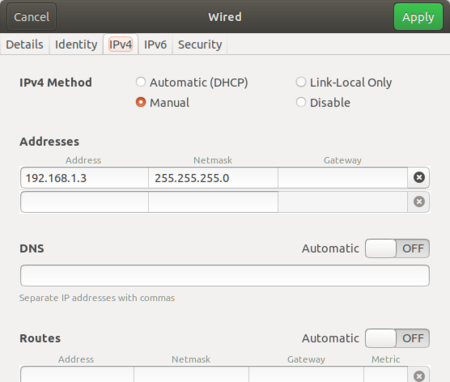
Next, set a static ip address with the following settings: Note that this IP address can be whatever you like, but it will need to match the gateway of the machine’s config.g settings.
You’re setup! Power up the machine, open a browser, and navigate to the machine’s ip address (this page if you used the same ip address).
Note that these IP address settings will now be tied to this particular dongle until you change or remove them.
