Duet3 Raspberry Pi Provisioning
In SBC mode, the Raspberry Pi handles high-level tasks like the web interface and networking, while the Duet 3 Control board handles the motion control. This setup also allows for future expansions like automatic tool alignment using TAMV that simply wont be possible on standalone boards.
Assumptions
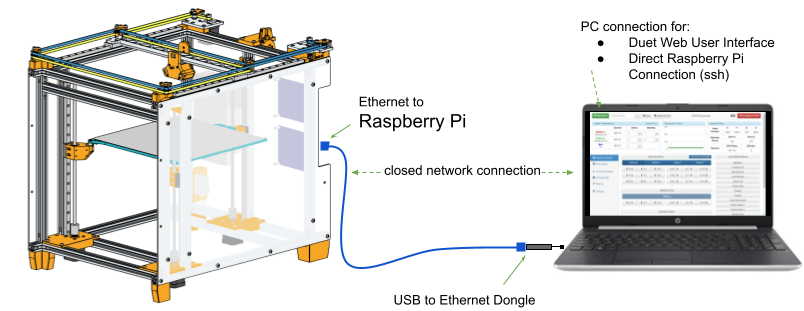
These instructions assume a wired network connection to the Raspberry Pi, like this one:
Instructions
For the Raspberry Pi, you will need a Micro SD Card with at least 8GB of space. 32GB is recommended, such that you can accommodate project updates.
Provision the Raspberry Pi's SD Card
- Download Etcher (for Windows/Mac/Linux).
- Download DuetPi.zip.
- Flash the DuetPi image onto the SD Card using Etcher.
Enable SSH on the SD Card
- Mount the SD Card onto your PC so that you can see the folder structure.
- In the /boot partition, create an empty file called ssh (without any file extension) or ssh.txt. The presence of this empty file is what enables an ssh connection.
Setup Networking on the SD Card
The goal is to set the IP Address of the Raspi before you login to it for the first time. There are two ways to do this.
The Simple Way
Works on Win/Mac/Linux.
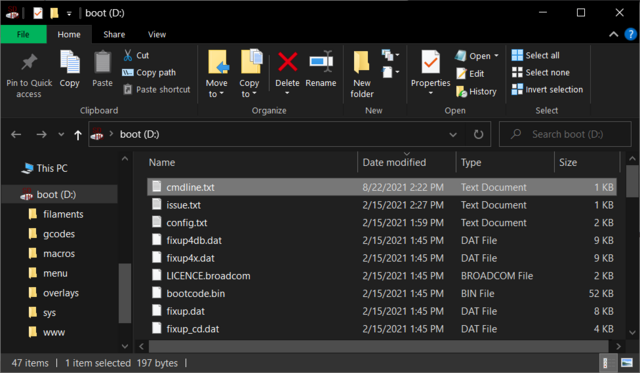
Plug the SD Card into your PC. From the /boot partition, open the file cmdline.txt.
This file contains a bunch of startup properties for the operating system, each of which is separated by a space.
At the end of that line, add a space, followed by ip=192.168.1.2:::255.255.255.0. Don't create a new line for this. The result should look like this:
Save this file to the SD card.
The Advanced Way
Mac/Linux only. Note that this way does not work for Windows because this partition of the SD card is not accessible.
- On the SD Card in the etc directory of the rootfs boot partition, open the dhcpcd.conf file with root permissions.
- Add the following lines to the bottom of the file. (This example assumes your ip address is 192.168.1.2, and your gateway is 192.168.1.3. Using these addresses as-is is consistent with the addresses set in the Connecting to Jubilee section that comes later.)
interface eth0
static ip_address=192.168.1.2/24
static routers=192.168.1.3
Load the SD Card into the Pi
Once all the changes have been made above to the SD card, remove it from your PC, and insert it into the Raspberry Pi. The Pi is now ready to be powered on.
Connecting your PC
Once the above setup is complete, you can connect your PC by following the Connecting to Jubilee Instructions.
Connect to the Pi via SSH
Log in to the Raspberry Pi with username: pi, password: raspberry
Expand the file system
By default, the Duet Pi Operating System image thinks it has 8GB of disk space. If you are using a larger micro SD card, you need to expand the file system such that it takes up the entire SD card.
From the Raspberry Pi terminal,
- expand the filesystem by invoking:
raspi-config --expand-rootfs
Changing the Localization (Country) on the SD Card
From the Raspberry Pi terminal,
- TODO
Sharing Internet with the Raspberry Pi
By default, the Raspberry Pi is not connected to the internet in this connection, so we need to share the internet from the PC that's connected to it.
On Windows
TODO
On Mac
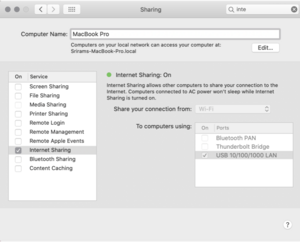
Go to Sharing within System Preferences. Click the checkbox next to internet sharing and the USB LAN dongle.
On Ubuntu
Open a text editor and save the contents below in a file named ipmasq.sh.
 # Clears if any old iptable rules/ policies are there.
iptables --flush -t nat

 # Now we will do Masquerading ie. we are doing NAT.
iptables --table nat --append POSTROUTING --out-interface wlan0 -j MASQUERADE
iptables --append FORWARD --in-interface eth0 -j ACCEPT

 # Enabling packet forwarding.
echo 1 > /proc/sys/net/ipv4/ip_forward
Note that the script above assumes that you are sharing the eth0 connection from wlan0. This may not be the case for your computer. (Mine was enx.. and wlp59s0. Check with the ifconfig command.
From the terminal, make the file executable with:
chmod +xTo share the internet connection, run the file with
sudo ./ipmasq.shReferences
- SBC Setup for Duet 3
- Enabling SSH on the Raspberry Pi
- Expanding the File System on the Raspberry Pi
- Static IP Address Setup on the Raspberry Pi
- Static IP Address Setup on the Raspberry Pi on first boot
- More Static IP Address Setup on the Raspberry Pi on first boot
- Sharing Internet with the Raspberry Pi on Mac


