Difference between revisions of "Tools"
Poofjunior (talk | contribs) |
Poofjunior (talk | contribs) |
||
| Line 13: | Line 13: | ||
* [[Sonicator Tool]] by [[User:Poofjunior|Poofjunior]] | * [[Sonicator Tool]] by [[User:Poofjunior|Poofjunior]] | ||
* [[Camera Inspection Tool]] by [[User:Poofjunior|Poofjunior]] | * [[Camera Inspection Tool]] by [[User:Poofjunior|Poofjunior]] | ||
| + | * [[XYZ Probe Tool]] by [[User:Poofjunior:Poofjunior]] | ||
* '''Your Tool Could Be Here!''' | * '''Your Tool Could Be Here!''' | ||
* Other community made tools may be found in [[Community Mods#Tools]] | * Other community made tools may be found in [[Community Mods#Tools]] | ||
Revision as of 20:10, 23 December 2022
Tools List
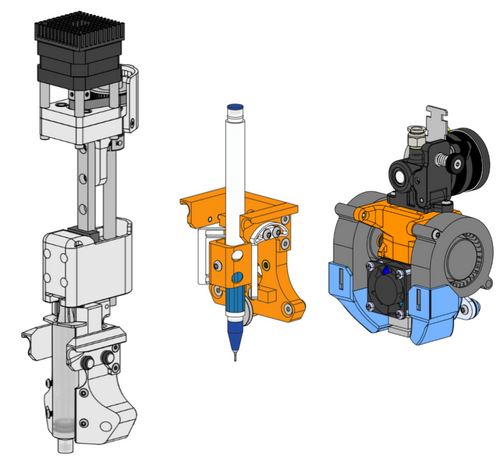
The current breakdown of actively maintained tools in the project repository is as follows
- Baby Bullet Extruder by Poofjunior
- Narrow Orbiter Extruder by edthesped
- Deprecated Bondtech Direct Drive Extruder by Poofjunior
- Passive Pen Tool by Poofjunior
- E3D Titan Aqua Mount by EMRosa
- ASMBL by E3D/Chris_was_here
- Laser Tool by Chris_was_here
- 10cc Syringe Tool by Poofjunior
- Sonicator Tool by Poofjunior
- Camera Inspection Tool by Poofjunior
- XYZ Probe Tool by User:Poofjunior:Poofjunior
- Your Tool Could Be Here!
- Other community made tools may be found in Community Mods#Tools
The Tool Parking Post
The parking post holds tools in the front of the machine when they aren't being used. It can be made from a mix of 3D-printed and off-the-shelf parts. It's also designed from a parametric CAD model that can be resized according to your custom tool. Since re-sizing the model requires working with the Solidworks files directly, a handful of sizes have been exported in advance, and STLs are available in the repository.
- Parking Post details page
- how do design around a particular parking post.
- list of pre-exported parking post sizes.
- Parking Post STLs
- Tool Parking Post Assembly Instructions
Creating a Custom Tool
Tools derive from the template in the tool template folder.
Component Placement
The shortcut to 3D modeling a tool with the right placements is to simply build on top of the CAD files in the template folder. However, starting from scratch is also straightforward.
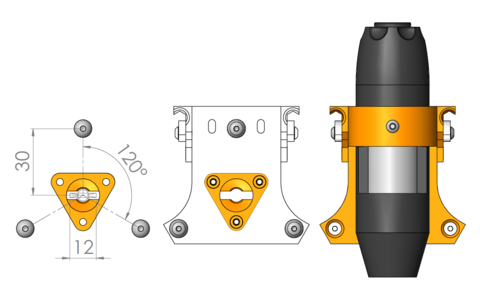
To create a custom tool that locks into Jubilee's carriage, you must place the tool balls and the wedge plate in a specific location, specified in the Tool Template Reference Dimensions PDF.
Size Constraints
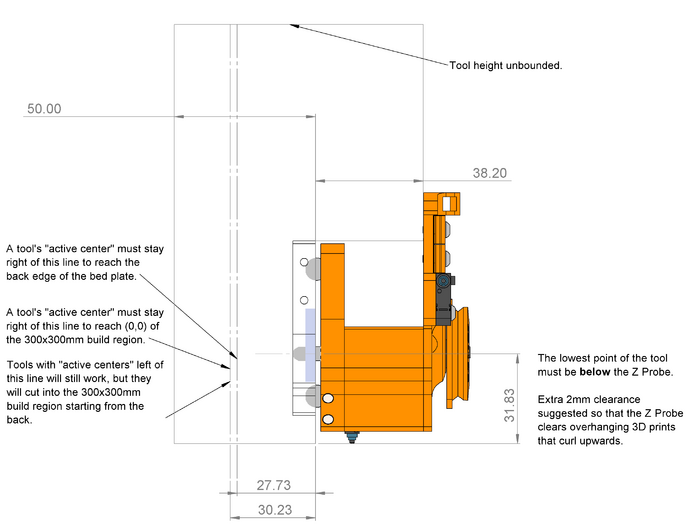
There are a few size constraints that may influence your tool's shape. They are called out below.
A number of example tools are shown in the full Too Interface Diagram PDF.
Note that many of these constraints are soft. Using longer dowel pins on the parking post will allow for deeper tools. Also, moving the tool's active center past the leftmost line will result in a working tool that simply has a bit less Y-axis travel.
Sharing a Tool
There are various ways of posting your tool online such that others can reproduce it. If you upload the source files online in a place like Github or Printables, you can simply create a tool page with a description (like the ones above) and link to those files within that page.
Tool Wire Management
Most tools require wires of some sort to control the tools active components. Some solutions that work include:
- Long (36-in.) Zip Ties
- Stainless Steel Strips from Aliexpress. Either 0.4mm x 5mm or 0.2mm x 10mm (doubled up) both work.
- Warning: these are sharp to handle and also eye hazards. Please wear safety glasses while working with them.
- 0.75mm Piano Wire


